The User Story Map is a simple and yet powerful way to visualize the story about how the users are using your product or service – and to build the right thing.
It is simple because it offers support to move quickly from understanding the user and their problems – to building and shipping the product, and it can be done just with sticky notes on a wall, or in simple digital tools.
It is powerful because it tells a story, it gives context to the user story and it gives a clear overview of the backlog and what we need to build to be able to support the user scenarios over all relevant touchpoints. It also supports collaboration and both horizontal and vertical slicing.
I am forever thankful to Jeff Patton who is the creator of User Story Mapping and from who I learned it from about 13 years ago or so. Without it I don’t know where I would have been today. It has been one of the most valuable methods for me to enable deliveries of great user experiences although in very complex domains, real deadlines (like sports events that happens when it happens) with one or up to +20 teams 🙏

It is a living, transparent, and value-based backlog that support the Product Owners and teams to find thin slices to release that create real value based on user scenarios, and not features. If you are looking to become a value and product-driven organization, this tool offers a lot of support.
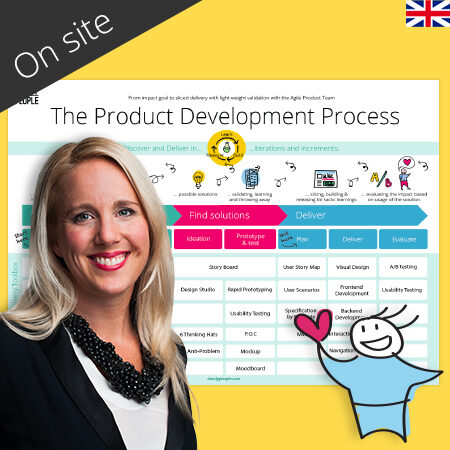
It might not come as a shock to you that the User Story Map is the most common tool used for Agile product planning with one or several teams. Jeff Patton invented it and brought it in as a major part of the CSPO (Certified Product Owner) training when he first created that many years ago for Scrum Alliance. Jeff Patton, with a background in UX and design, has been a great force in Agilizing customer-centric ways of working and finding ways to connect it in a natural way to Scrum and product teams.
User Story Map Concepts
A user story map tells a story about a type of person doing something to reach a goal. Make sure to include them in your map along with a little information about them. Try using lightweight personas or roles to describe your users.

User Tasks
User’s tasks are short verb phrases that are the basic building block of a map. If I ask you what you did earlier today when using email, you’ll likely respond with tasks like:
• Read an email message
• Respond to a message
• Mark a message as spam
User Tasks makes great User Story Titles
Write short verb phrases on cards or stickies. Use them later as your story titles. If you use the story template to write descriptions, the task fits
nicely right after “I want to,” the activity fits nicely right after “so that…”
Goal Level
The actions that users take in order to reach their larger goals have a goal level themselves that’s tied to user behavior.
Summary: lots of tasks done in support of a bigger goal.
Functional: I’d expect to complete this task before taking a break.
Sub-Functional: smaller things done in support of a bigger task.
As you read across tasks in the backbone, check to make sure that tasks are of a similar goal level.
Activities
Activities organize tasks done by similar people at similar times to reach a goal. For your email software activities might include
• Going through my inbox
• Configuring my email client
• Organizing messages into folders
Narrative Flow
The left to the right axis in a story map is organized in the order you’d tell the story about your user to someone else.

Of course, any specific user might choose to do different things in a different order. Use conversation to explain the details and variations.
If you’re looking for the precision of a workflow model, flow chart, or UML model, then a story map isn’t your best choice.
A story map will take lots of conversation to use effectively. But then that’s the purpose of stories.
Details, Details…
Break down high goal level tasks into:
• Sub-tasks
• Alternative tasks
• Exceptions
• Details
It is ok to capture ideas for solutions are ok in the details of the user tasks or activities of what the UI might look like or what the system might do in the background. But preferably this is something that is done first with design studio or something to use the collective intelligence, and then as the team start to deliver in each sprint.

Release Slice
Draw a line across the map, or use a tape to identify slices of tasks that users might use your software to reach their goals. The smallest number of tasks that allow your specific target users to reach their goal compose a viable product release.
Use release slices to identify small experiments, minimal viable product releases, or a “walking skeleton” version of your product.
Identify the target outcomes of your slice in a sticky note or card on the side of the slice.
Map Now & Later
Use a map to describe the world as it is today. Inject pains, joys and rewards, details and observations, and solution ideas. This can be done based on your Customer Journey, or your User Transaction Map, which are great tools to uncover the as-is-state of processes, complex interactions, and the experience.
Evolve the map using design and discovery activities such as storyboarding or design studio to describe the behavior you expect users to have in the future.
User story maps are for understanding now, and imagining later.
Map the Whole System
Map a whole process as it crosses through a number of types of users and touchpoints. Story maps are for looking at the big picture.
The Process of mapping
The story map evolves with your understanding of your users and your product solution.
1. Before mapping
Set the stage on what customer journey, product, service, and target users you most likely will have in your map. Remember this might be updated once you uncover the full story. This might tell you who to involve in creating it, and what customer journeys, user transaction maps, or personas that might need to be done before you move over to the user story mapping.
2. Map the big picture
Focus on getting the whole story. Think “mile- wide, inch deep” The activities and high-level user tasks that tell the whole story form the backbone of your story map. Look at the customer journey end to end, what they do before, during and after using your product.
Start with the user type most critical to your product’s success. Imagine a typical day in your user’s life with your new product, or use information from your user research and map it directly from your customer journey or user transaction map. Map the steps they take as user tasks left to right. It is ok to make assumptions at this phase, but all risky assumptions would have to be validated to make sure you deliver the right product and meet real user goals.
Identify user activities – groups of tasks that work together to support a common goal. Activities often emerge after you see more of the story. Make sure the user activity end with the user reaching its user goal in that activity.
Add in additional users. As you follow the typical use of your product, you may find other types of users enter your story. Continue modeling their story left to right.

3. Explore
Fill the body of your story map by breaking down larger user tasks into smaller subtasks. During this phase, you’ll add cards, split one card into two, rewrite cards, and reorganize them.
Any tasks and sub-tasks that might not give value to a user will be out of scope and not prioritized to build or work on, but this will be discovered later in the process when you start to validate your ideas and release.
It might be a good idea to timebox this phase. Keep in mind that “good enough” actually will take you longer than having all the details in now when you have the least information.
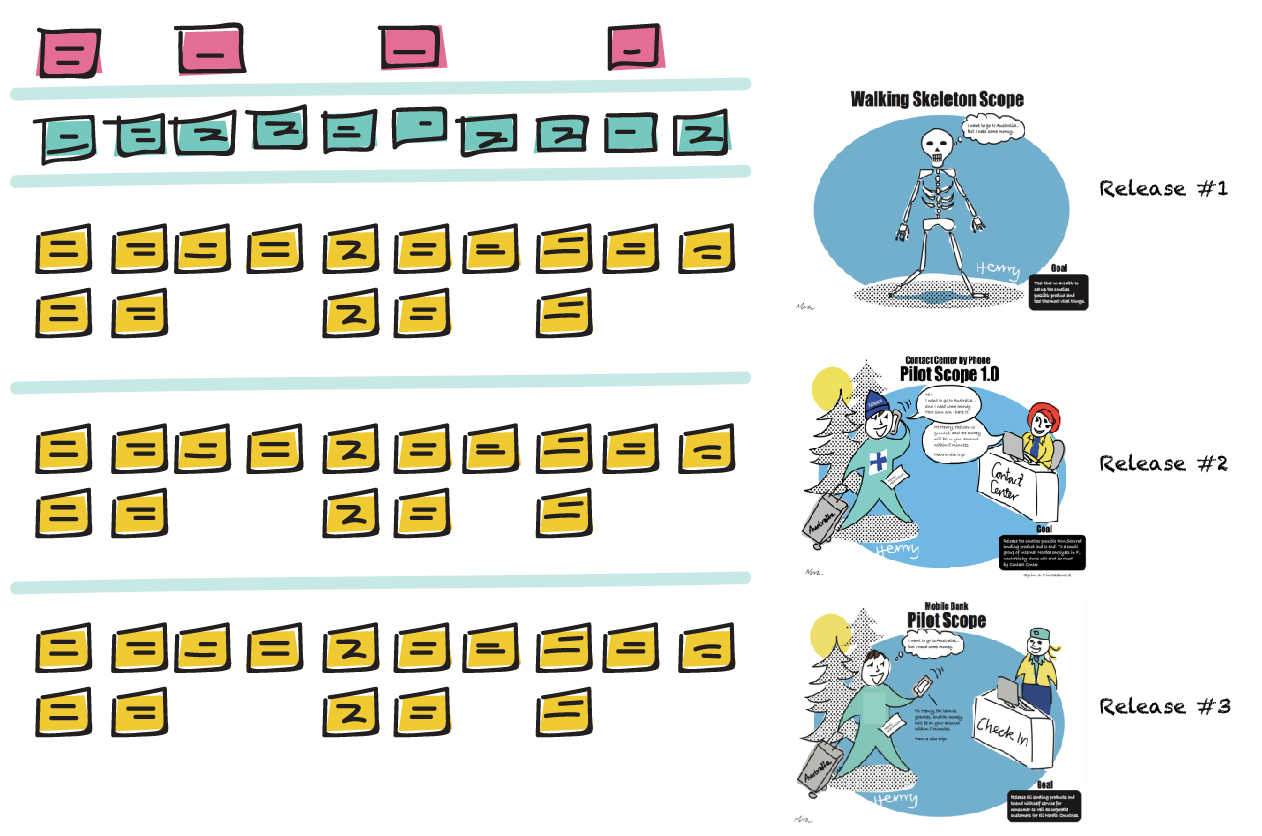
4. Slice our viable releases
Slice your map into holistic product releases that span the users and use of the product. These slices form an incremental product release roadmap where each release is a minimal viable product release.
For each release name the target outcomes and impact. Outcomes and impact say how this release contributes to the overall goal in the “big why” that motivates building the product, and how users will behave in a way that helps us reach the goal.
Example of release goals:
Release #1 enabling the user scenario “Start an account, put in money and use it online” for the persona “Millenial Millan”
Release #2 enabling the user scenario “Send and receive money from friends” for the persona “Millenial Millan”
For each release, identify product success metrics. Answer the question: “what would we measure to determine if this product was successful?” Ideally, you’ll find specific changes in user’s behavior as they use the product the way your story map imagines.
5. Slice out a development Strategy
Slice the first release of your map into three or more delivery phases that allow you and your team to learn fast and avoid risk. Think of the opening, mid, and end-game phases of a chess game.
This development strategy will help you release the best product possible in the time constraints you have.
- Opening Game builds a “functional walking skeleton” – the simplest possible functional version of the product. As you finish “Opening game” vet the product with users and other stakeholders. Begin validating wanted performance and scalability.
- Mid Game completes all major functionality and makes existing functionality richer and more complete. Continue user testing and leverage feedback to adjust the product. Continue testing performance and scalability.
- End Game refines the product in preparation for release. Continuously assess release readiness based on your release level product goals. Count on unforeseen work to emerge during this last stretch of development.
Once the User Story Map is up this is the living backlog that the Product Owner, or Product Owners use for continuous planning together with the team or teams. Based on the release goals the team(s) can plan what user tasks to cover, and the Product Owner(s) can re-plan the release goals based on feedback.

The User Story Map as the Product Backlog – with one, or several teams
A lot of times when using a User Story Map for a big project, you end up not doing about 50% of the storys. This is due to that those are not needed to reach our goals and satisfy our users. This of course saves a lot of time and money, that we can spend on the next prioritized goal.
When working Agile we want to keep our teams stable over time and they will release incrementally, and iteratively, and the teams always maintain what they built.
The user story map is a great way for the product owner to facilitate that ownership over time since the backbone of a process always stays the same they can add in new stuff when they learn about it, and re-plan their sprints and release goals. The map is also a great way to keep stakeholders in the loop on what the teams are working on, and what not. It is super transparent.

Want to learn more?
This content is part of our self paced online training Agile Product Development Process and Organization In a Nutshell Training and Toolbox in our Digital Academy.
Agile Online Trainings at your own pace, in a fun, brain-friendly and engaging interactive format. Get access now!